ARLAS with Keycloak
What is it?
Keycloak aims at adding an Identity and Access Management (IAM) to the ARLAS stack.
Keycloak provides authentication (user login) and authorisation (permissions to access data and APIs) services to ARLAS
components: server, WUI, hub, builder...
The stack can be started with or without Keycloak.
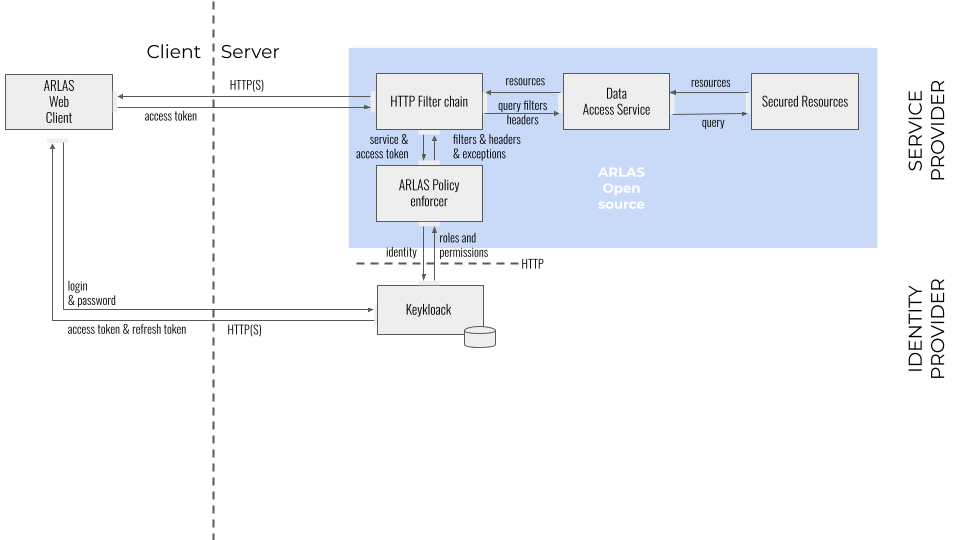
ARLAS with Keycloak is composed of 3 main components:
- an implementation of the ARLAS PolicyEnforcer (interface available in the ARLAS-server/arlas-commons module:
io.arlas.filter.core.PolicyEnforcer)- Keycloak implementation (
io.arlas.filter.impl.KeycloakPolicyEnforcer)
- Keycloak implementation (
- a Keycloak instance.
- An optional resources.yaml file to define the Keycloak resources (see Keycloak v23.0 Configuration section)
Policy Enforcers configuration
The policy enforcers are in the arlas-commons module.
The implementation to activate must be defined in the backend component configuration:
| Environment variable | configuration variable | Default | Value for Keycloak |
|---|---|---|---|
| ARLAS_AUTH_POLICY_CLASS | arlas_auth_policy_class | io.arlas.filter.impl.NoPolicyEnforcer | io.arlas.filter.impl.KeycloakPolicyEnforcer |
Further configuration is required:
| Environment variable | configuration variable | Default | Policy enforcer |
|---|---|---|---|
| ARLAS_AUTH_KEYCLOAK_REALM | arlas_auth.keycloak.realm | arlas | Keycloak |
| ARLAS_AUTH_KEYCLOAK_URL | arlas_auth.keycloak.auth-server-url | http://keycloak:8080/auth | Keycloak |
| ARLAS_AUTH_KEYCLOAK_RESOURCE | arlas_auth.keycloak.resource | arlas | Keycloak |
| ARLAS_AUTH_KEYCLOAK_SECRET | arlas_auth.keycloak.credentials.secret | none | Keycloak |
Optional configuration:
| Environment variable | configuration variable | Default |
|---|---|---|
| ARLAS_AUTH_INIT_RESOURCES_PATH | arlas_auth.init.resourcesPath |
Keycloak v23.0 Configuration
Concepts
Keycloak is configured through multiple items. ARLAS uses only a subset of them, which are described here.
- Realm: a realm is the container of the configuration used by an ARLAS instance (clients, users, groups...)
- Client: a client contains the configuration that controls the ARLAS components access.
- Client roles: roles can be given to users in order to control their rights. Some role names must follow some specific naming rules (such as ARLAS groups).
- Authorization/Resources: resources are a list of ARLAS rules and headers (see before). Their names contain the rule/header to be sent to ARLAS. Resources with the same type value can be referenced together through that value in permissions.
- Authorization/Policies: policies are pieces of logic that are used to check a condition. For now only "role policies" are used: it checks if a user has a given client role.
- Authorization/Permissions: only "resource-based" permissions are used. They associate resources or resource types with policies. Whenever a permission's policy matches, the associated resources are sent to ARLAS in the authentication process of a user (in the permission claim of the RPT : requesting party token)
- Groups: are used to group together a list of client roles in order to facilitate their allocation to users. Modifications to a group (adding/removing roles) will be spread to all users belonging to the group. This is not the same concept as an ARLAS group.
- Users: are accounts allowed to connect to ARLAS. They can (and should) belong to keycloak groups and can also be mapped to individual client roles.
There are four types of roles used by ARLAS, which are distinguished by their prefixes:
group/role/arlas/role/data/role/m2m/importer
Roles prefixed with group/ are used to manage access to dashboards. The specific group group/public allows you to share dashboards with unauthenticated users. Groups prefixed with group/config.json/ allow you to define access groups for dashboards (but not for data!).
Roles prefixed with role/arlas/ are used to define access to ARLAS services:
| Role | Service |
|---|---|
role/arlas/user |
Data access service |
role/arlas/builder |
Dashboard development services |
role/arlas/downloader |
ARLAS AIAS Download services |
role/arlas/datasets |
ARLAS AIAS Ingestion and Enichment services |
role/arlas/tagger |
ARLAS Tagging service |
Roles prefixed with role/data/ are used to define data access. By default, the role/data/all role must be created and grants access to all data to users having that role. Other roles (role/data/xxx), can be created and associated with a resource, which is itself associated with a permission, which is itself associated with a policy.
Important: the role/data/all role must not be assigned to users having more restricted access through other role/data/xxx roles.
The role/m2m/importer role allows collections to be imported via the dedicated endpoint on the ARLAS server, primarily used by M2M processes.
Warning
The list of client roles associated to a user must result in at least one resource once the permissions are evaluated, as "no permissions" equals to 403 response (and not an empty permission list) when requesting the RPT from Keycloak.
Manual configuration
In order to configure Keycloak from scratch, follow this tutorial, as a minimum set of settings to make it work with ARLAS.
Another way is to import the default configuration file given with this module (see next section).
- Create a realm. Its name must be configured in
ARLAS_AUTH_KEYCLOAK_REALM. Switch to the realm administration console. The following lines refer to the appropriate menu items from the console with a prefix text in parentheses (left menu/right tabs/...), e.g. (Clients/Lookup) - (Clients/Lookup/Create) Create a new client with:
- Client ID=
arlas-backend(must be configured inARLAS_AUTH_KEYCLOAK_RESOURCE) - Client Protocol=
openid-connect - Next
- Client ID=
- (Clients/Arlas-backend/Capability Config) Change the following configuration items:
- Client authentication=
ON - Authorization=
ON - Standard Flow=
ON - Next
- Direct access grants=
ON - Valid Redirect URIs=
* - Valid post logout redirect URIs=
* - Web Origins=
+ - Save
- Client authentication=
- (Clients/Arlas-backend/Login settings) Select Client Authenticator "Client Id and Secret" and copy the Secret value to
ARLAS_AUTH_KEYCLOAK_SECRET - (Clients/Arlas-backend/Roles) Add the following roles:
group/public(Seegroupsin Concepts)group/config.json/xxx: add as many groups as needed wherexxxwill be the name of groups available to share dashboards in ARLAS hub and that can be associated to data filters.role/arlas/builder(Seerole/arlas/in Concepts)role/arlas/taggerrole/arlas/userrole/arlas/downloaderrole/arlas/datasetsrole/data/all(Seerole/data/allin Concepts)role/data/xxx: add as many roles as needed wherexxxwill be a role linked to a data permission (see Protect data access)role/m2m/importer(rule to import collections via the dedicated ARLAS server endpoint, mainly used by M2M processes)
- (Clients/Arlas-backend/Authorization/Policies) Add role policies for each new role you have added.
Choose a policy type
Role. Keep the logic to Positive. Choose the relevant role in thearlas-backendroles list. - (Clients/Arlas-backend/Authorization/Resources) Add any resource
header:name:value(as name) you need (optionally setting atypeif you need to map more than one in agroup/config.json/...role) and create permission (select relevant role policy).
If the resource length is too long for the Keycloak resource name, you must use the resources.yaml configuration file to define the resources.
In that case, the resource name in Keycloak must be the one defined in the resources of resources.yaml and the resource value will be define in the values part under the name in the yaml.
Example of resources.yaml file:You can use the environment variableresources: resourceTooLongForKeycloakName: description: - "resourceTooLongForKeycloakName description" values: - h:partition-filter:{*:*}ARLAS_AUTH_INIT_RESOURCES_PATHto set the path of the resources.yaml file.
A basic example: you might need to authorize a user to see all the fields of all the collections. This is a resource namedh:column-filter:*:*. Create a role and policy namedrole/data/all. Then create a resource namedh:column-filter:*:*and create a permission for this resource and applyrole/data/allto it. - (Groups) Add groups with some
arlas-backendclient roles according to the way you want to assign permissions to users. - (Users) Add users:
- Username= choose name
- Groups= choose groups
- Role mappings: assign relevant individual roles from
arlas-backendclient roles if not assigned through groups - Save
- (Users/\<user>/Credentials) Set password
- (Clients/Lookup/Create) Create a new client with:
- Client ID=arlasm2m
- Client Protocol=openid-connect
- Next
- (Clients/Arlasm2m/Capability config) Change the following configuration items:
- Access Type=confidential
- Switch off Standard Flow Enabled
- Switch on Service Accounts Enabled
- Save
- (Clients/Arlasm2m/Service Account Roles) Select
arlas-backendin the Client Roles drop down list and add selected roles:- role/arlas/user
- role/m2m/importer
- group/public (to create public dashboard)
- (Clients/Lookup/Create) Create a new client with:
- Client ID=
arlas-front(must be configured in arlas frontend app configurations) - Client Protocol=
openid-connect - Save
- Client ID=
- (Clients/Arlas-backend/Capability config) Change the following configuration items:
- Client authentication=
OFF - Authorization=
OFF - Standard Flow=
ON - Direct access grants=
OFF - Implicit Flow=
OFF - Valid Redirect URIs=
* - Valid post logout redirect URIs=
+ - Web Origins=
* - Save
- Client authentication=
Import configuration
Warning
To import configuration remove all the JS type resource (Default resource).
- In the realm selection drop down list, select "Create realm".
- Select the file to import and click
Create(template is inhttps://github.com/gisaia/ARLAS-Exploration-stack/blob/develop/conf/keycloak/keycloak.realm.json) - (Clients/Arlas-backend/Credentials) Select Client Authenticator "Client Id and Secret", regenerate the secret,
and copy the Secret value to
ARLAS_AUTH_KEYCLOAK_SECRET - (Clients/Arlasm2m/Credentials) Select Client Authenticator "Client Id and Secret", regenerate the secret (and copy if needed)
- (Clients/Arlas/Roles) Add the following roles:
group/config.json/XXXXX: add as many groups as needed whereXXXXXwill be the name of groups available to share dashboards in ARLAS hub and that can be associated to data filters.
- (Clients/Arlas/Authorization/Policies) Add role policies for each new group you have added
- (Clients/Arlas/Authorization/Resources) Add any
header:name:valueyou need (optionally setting atypeif you need to map more than one in agroup/config.json/...role) and create permission (select relevant role policy) - (Groups) Add groups with some
arlas-backendclient roles according to the way you want to assign permissions to users. - (Users) Add users:
- Username= choose name
- Groups= choose groups
- Role mappings: assign relevant individual roles from
arlas-backendclient roles if not assigned through groups - Save
- (Users/\<user>/Credentials) Set password